Single sign on
Single sign-on (SSO) lets people sign in to ChronoHub with the account they already use at your organisation, through an identity provider that supports OpenID Connect, such as Microsoft Entra ID. It is set up under Integrations → SSO, which only administrators see.
One identity provider can be configured. While it is, the sign-in page offers Sign in with SSO above the password sign-in; signing in with a password or a passkey remains available.
Setting up the identity provider
Register ChronoHub as an application with your identity provider first. The provider then gives you the values the form asks for.
| Field | What to enter |
|---|---|
| Issuer URL | The provider's issuer address, for example https://login.microsoftonline.com/{tenant-id}/v2.0. ChronoHub reads the provider's configuration from it. Required |
| Client ID | The ID of the application registered with the provider. Required |
| Client Secret | The secret issued for that application. Required the first time |
| Redirect URI | Shown, not entered. Register this exact address with the provider as a Web redirect URI. It is derived from your organisation's ChronoHub address |
The provider must include the person's email address in the sign-in token: ChronoHub identifies people by it.
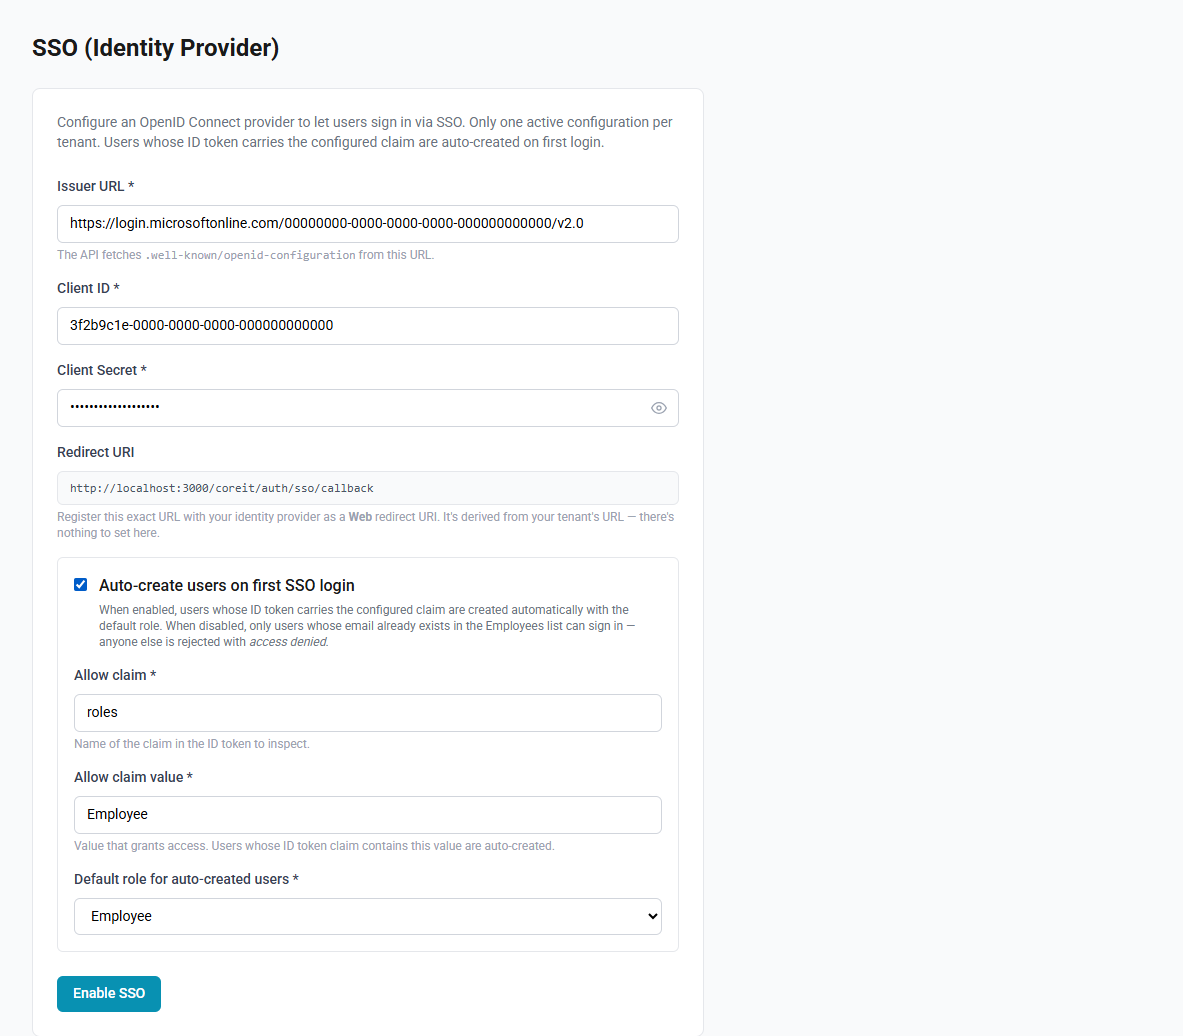
How to set up SSO
- Open Integrations → SSO.
- Enter the Issuer URL, the Client ID and the Client Secret.
- Copy the Redirect URI, and register it with the identity provider.
- Decide whether people are created automatically; see below.
- Select Enable SSO.
Once SSO is set up, the button reads Save changes. The client secret is not shown again: the field stays masked, and leaving it masked keeps the stored secret. Enter a new one to replace it.
Who can sign in
People who already have an employee record sign in with SSO when the email address the provider sends matches the Email or the Login email (override) on their record. Letter case does not matter. Nothing else needs setting up for them. See Login email override.
People without a record can be created on their first sign-in. Tick Auto-create users on first SSO login, and enter:
- Allow claim: the name of the claim in the sign-in token to inspect, for example
roles. - Allow claim value: the value that grants access, for example
Employee. It must match exactly, including letter case. Where the claim holds a list, one entry must match. - Default role for auto-created users: Employee, Manager, Admin or HR.
A person created this way takes their name from the provider, a code from the part of their email address before the @, and the Default country from Settings. Their record can be completed in Employees afterwards. Where your plan limits seats, they hold none until an administrator assigns one; see Seats.
Without auto-creation, anyone whose email address matches no employee record is refused.
People created automatically keep depending on the claim: if the provider stops sending it, or auto-creation is switched off, SSO refuses them.
How people are linked to their provider account
The first SSO sign-in links an employee record to that person's account at the provider. From then on, ChronoHub recognises the person by that account, even if the provider later sends a different email address. A sign-in through any other account with the same email address is refused, so that nobody can take over a record by giving another account the same address.
The links belong to one identity provider. Changing the provider, or disabling SSO, removes them all, and each person is linked again at their next SSO sign-in, by email address, as at their first.
Changing the identity provider
Changing the Issuer URL moves SSO to another identity provider, for example after your organisation moves to a new directory. Before saving, ChronoHub asks for confirmation, as the change affects everyone who signs in with SSO. Changes to the other fields, such as a new Client Secret, keep the links.
How to change the identity provider
- Check that each person's email address at the new provider matches their Email or Login email (override) in ChronoHub. A person whose addresses differ is refused, or, with auto-creation on, gets a second employee record.
- Register ChronoHub with the new provider, and register the Redirect URI there.
- Open Integrations → SSO.
- Enter the new Issuer URL, Client ID and Client Secret.
- Select Save changes.
- Read the confirmation, and select Change identity provider.
Everyone's link to the previous provider is then removed. Each person signs in with SSO as before, and is linked to their account at the new provider.
Disabling SSO
Select Disable SSO, and confirm. The sign-in page stops offering SSO, the stored configuration is removed, and every person's link to their provider account is removed with it. To use SSO again, set it up anew; people are then linked afresh at their first sign-in.
Employee records stay as they are. Anyone who signed in only with SSO, including everyone created automatically, can then sign in only if a password is set for them: from Forgot your password? on the sign-in page, or with a reset link sent from their employee record.
Messages on the sign-in page
| Message | What it means |
|---|---|
| This account is not authorized to sign in. Contact an administrator. | No employee record has this email address and the person may not be created; the record is inactive; or a person created automatically lacks the claim |
| The identity returned by SSO does not match this account. Contact an administrator. | The email address belongs to a record already linked to a different account. If your organisation has moved to a new provider, change the Issuer URL as described above |
| The identity provider reported an error. Please try again. | The provider refused or cancelled the sign-in |
| Could not complete single sign-on. Please try again. | ChronoHub could not complete the exchange with the provider, for example because the Redirect URI registered there does not match |
See Signing in for the sign-in page as the user sees it.